The Cervico Mold is an in-office tool used for the fabrication of the cervico healing abutments and impression posts.
It can also be used for the duplication of a modified healing abutment or temporary prosthesis to a duplicate impression post. It features 17 wells that can be used for all of the above purposes.
The tools of the Cervico Mold system are: • Mold Base • Centered Silicone Insert • Base screw driver
Item No. 5213006650000
How it works
The top ring of the base carries a letter coding that corresponds to the shape and size of the well of the silicone insert.
The bottom ring of the base caries a number coding that corresponds to the VPI Prosthetic connection Insert installed into the base. (The VPI Prosthetic connection inserts are the elements used to make the mold compatible with the implant system you use. They are NOT implant analogs, instead they are components with unique features fabricated and distributed by VP Innovato Holdings Ltd.)
The top ring of the base, along with the silicone insert installed in a stable position within it, can rotate in relation to the bottom ring of the base. This allows the alignment of different wells of the silicone insert with different VPI Prosthetic connection Inserts installed into the base of the mold.
Cervical Shaped Wells
Anatomical shaped wells (12) that correspond in shape and dimensions to the anatomical tabs of the Cervico Guide carrying the same coding.
Cylindrical Shaped wells
Cylindrical shaped wells (4) that correspond in shape and dimensions with the cylindrical tabs of the Cervico Guide carrying the same coding.
i.e The largest cylindrical well is called duplication well and is used during the impression post duplication process
The aS, aM and aL tabs correspond to the cervical margin dimensions and shape of the crown of anterior teeth (Small / Medium /Large)
The pS, pM and pL tabs correspond to the cervical margin dimensions and shape of the crown of premolars (Small /Medium / Large
The m1S, m1M and m1L tabs correspond to the cervical margin dimensions and shape of the crown of squared shape molars (Small / Medium /Large)
The m2S, m2M and m2L tabs correspond to the cervical margin dimensions and shape of the crown of elongated shape molars (Small / Medium /Large)
The wells c5, c6, c7, c8 are meant to be used for the production of cylindrical in shape healing abutments with diameters of 5, 6, 7 and 8 mm respectively.
The Cervico Mold is an in-office tool used for the fabrication of the cervico healing abutments and impression posts aiming to the generation and accurate recording of a prosthetically and biologically ideal emergence and cervical profile.
Step 1
Couple thread the temporary abutment into the desired well, manually.
The printed dot on the silicone insert is correlated to the orientation of the prosthetic connection of the VPI Prosthetic connection insert and thus to the one of the temporary abutment and implant.
Step 2
Fill in the open space with suitable dental composite material and light cure for 40 sec.
In case of large size wells the space can be filled and light cured in two increments in order to ensure proper curing of the composite material.
Step 3
Unthread and remove the cervico healing abutment from the mold and light cure for additional 20 sec. Clean the well of the mold with a cotton tip soaked in alcohol.
Step 4
Secure the cervico healing abutment on the easy grip handle and proceed with polishing of the composite surface, using a micromotor. Utilize the polishing mop and polishing paste to smoothen the composite surface, at 10000 rpm.
Follow the same steps 1,2,3 utilizing a stock impression post for fabricating the custom duplicate impression post.
Duplication Process
The Cervico Mold can be utilized for the duplication of the sub-gingival portion of a modified healing abutment or a temporary prosthesis to a duplicate impression post.
Modified Abutment
If modification of the sub-gingival portion of the cervico healing abutment has been initiated, the duplication process must be used.
Step 1
Coat the duplication well with vaseline and couple thread the modified healing abutment or temporary prosthesis.
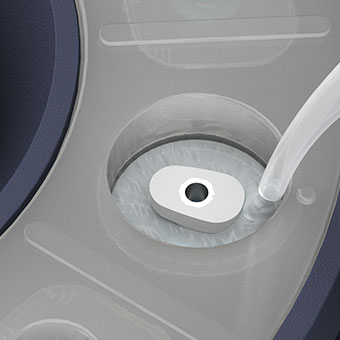
Step 2
Fill the open space with clear silicone impression material.
Step 3
Let the silicone set for approximately 3-6 minutes according to manufacturer guidelines.
Step 4
Remove the modified healing abutment, or temporary prosthesis from the mold.
Step 5
Couple thread the core impression post.
Step 6
Fill the open space available with the suitable dental composite material.
Step 7
Light cure the composite material for 40 sec. Then, remove the customized impression post from the mold and light cure for additional 20 sec.
Attention! Once the duplication process is complete, remove the silicone from the well immediately
Modified Impression Post
The generated custom impression post is an exact duplicate of the modified healing abutment, or temporary prosthesis at least at its sub-gingival portion.
Silicone Inserts
The Cervico Mold is available with the centered silicone insert. An off-centered silicone insert is also available for purchase as an accessory. This silicone insert allows the fabrication of cervico healing abutments and impression posts that have a part of their custom body off centered in relation to the axis of the temporary abutment or impression post. This is particularly useful for lingually placed implants in immediate extraction and implantation protocols.
To remove the silicon insert from the base simply pass your screwdriver through one of the open bores in the base of the mold and slowly push the silicon insert up, then grasp the silicone insert from the area of duplication well and remove it gently out of the base. When you wish to re-install the silicone insert, then align the duplication well with the circular ring present on the base. Push in the insert peripherally into the base until it is fully seated.
Difference between the Centered and Off-Centered Silicone Inserts
The Centered Silicone Insert produces Cervico healing abutments and Impression Posts, where their custom body is centered in relation to the long axis of their core.
The Off-Centered Silicone Insert produces Cervico healing abutments and Impression Posts, where a portion of their custom body is off-centered in relation to the long axis of their core.
The custom healing abutments produced with the Off-Centered Silicone insert can be proven particularly useful in clinical cases of immediate implant placement after tooth extraction, where the implant is usually placed in a more lingualised position.
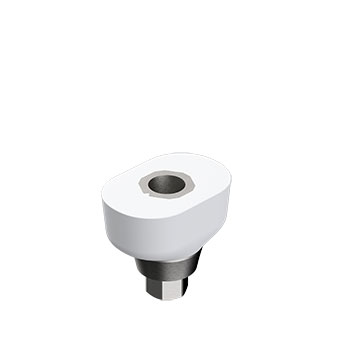
VPI Prosthetic Connection Inserts
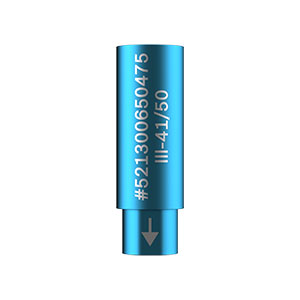
A VPI Prosthetic connection insert is a unit with innovative design that replicates the prosthetic connection and platform of a given implant. The innovative external design allows the installation of the insert into the base of the mold in only one functional orientation and a stable position. The innovative internal design of the VPI Insert allows it in many occasions to be functional with multiple platform sizes of the same prosthetic connection. Each insert is available with a retention screw that allows its safe coupling to the mold. The insert has its item number and an arrow laser printed on its outer surface. A plethora of different VPI Inserts are available in order to fulfil the clinical needs. Please refer to the VPI Prosthetic connection inserts compatibility chart in order to determine the one that fits your needs.
Identify the desired open socket of the mold and install the VPI insert by light pressure. The insert will be able to be installed if only you align the arrow of the insert to the triangular orientation mark of the base. Couple thread the insert to the underside of the mold utilizing the provided VPI Cervico 2mm Allen Screw driver and retention screw.
How to select the proper socket for insert installation. Clinical Significance.
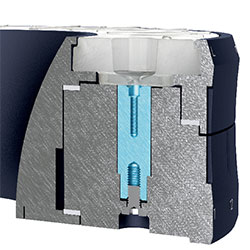
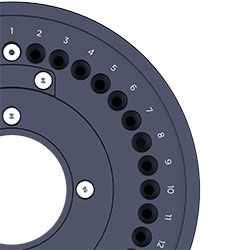
The mold comprises 36 sockets that can receive the VPI Prosthetic connection inserts. These sockets are divided in four groups that allow the installation of the inserts in four different depths, ranging from 0 to 3 mm. All the sockets of the same group are similar to each other. The reason for providing many similar sockets is to allow the potential installation within the same mold of many different VPI prosthetic connection inserts. This will allow the same mold to be functional with many different implant systems.
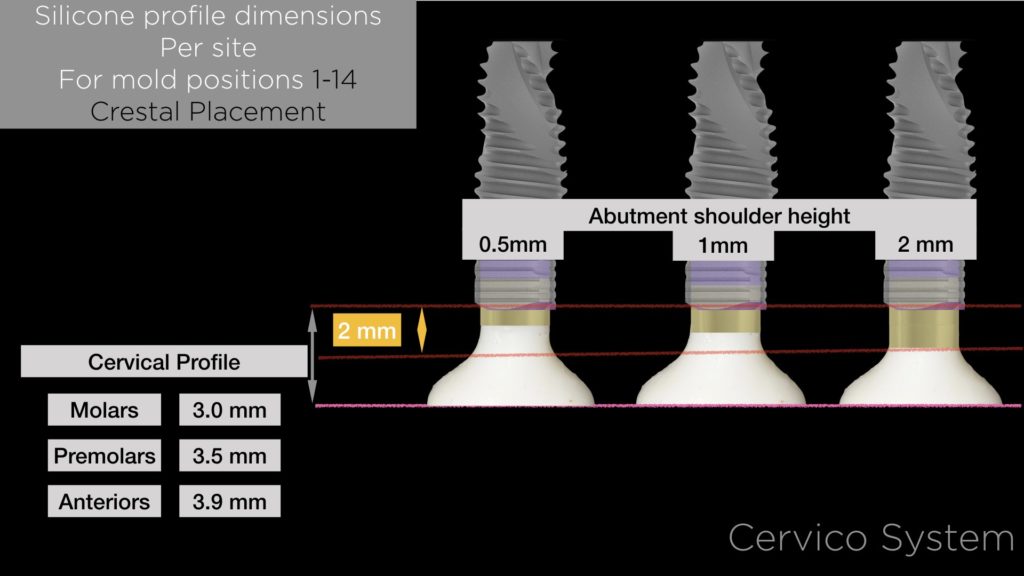
Sockets numbered 1 -14 are all the same and allow the insert to be flash with the base. This is suitable for crestal or slightly supra-crestal surgical implant placement protocols. Temporary abutments with a shoulder height of 0.5 to 2mm should be used as cores.
Sockets numbered 29-33 are all the same and allow the insert to be 2 mm countersunk within the base. This is suitable for 2mm sub-crestal surgical implant placement protocols. Temporary abutments with a shoulder height of 2.5 to 4mm should be used as cores.
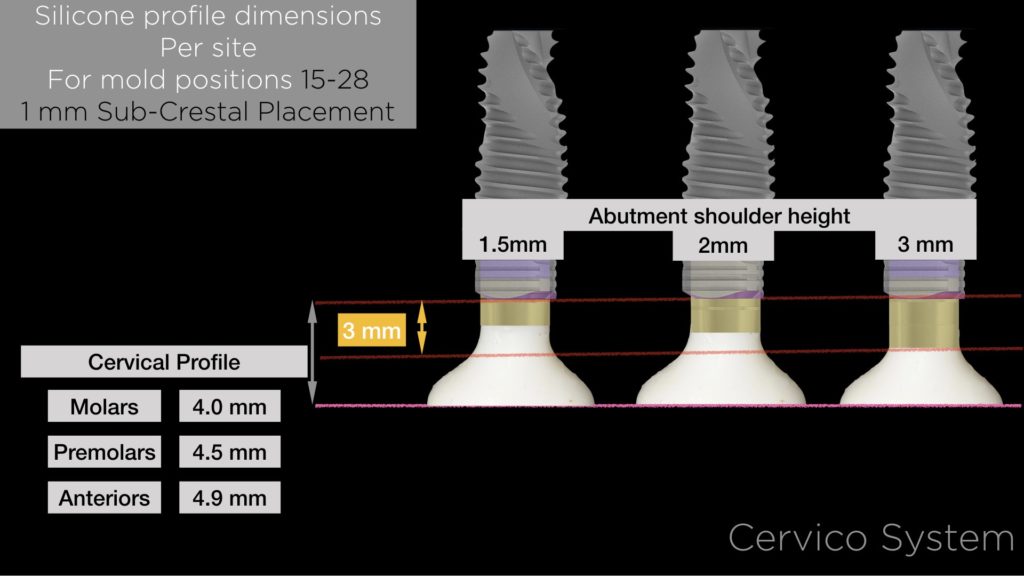
Sockets numbered 15-28 are all the same and allow the insert to be 1 mm countersunk within the base. This is suitable for 1mm sub-crestal surgical implant placement protocols. Please notice that also the VPI inserts comprising an external hex connection must be installed into this group of sockets. Temporary abutments with a shoulder height of 1.5 to 3mm should be used as cores.
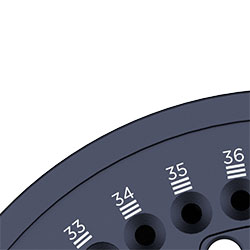
Sockets numbered 34-36 are all the same and allow the insert to be 3 mm countersunk within the base. This is suitable for 3 mm sub-crestal surgical implant placement protocols. Temporary abutments with a shoulder height of 3.5 to 5mm should be used as cores.
In this image you can see how you can correlate the proper position of VPI Prosthetic connection insert inside the mold to your surgical implant placement protocol and to the proper temporary abutment/core to be utilised in order to fulfil your needs. We recommend that you utilise a temporary abutment shoulder with a height that will allow the presence of titanium (composite free) surface for the first 2mm supra-crestally. This will allow maximum soft tissue thickness and proper biologic width development on the critical first 2mm supra-crestal area. In case you follow this recommendation then please utilise the biggest abutment shoulder height recommended in each group shown above (2mm – 3mm – 4mm – 5mm).
The different sockets of the Cervico mold in combination with the use of temporary abutments comprising shoulders of different heights can allow you to fully control the final shape/profile of your custom healing abutments. Additionally you can have full control of the final height at which the cervical profile will be created for the different groups of teeth and different protocols of implant depth placement in relation to the desired position of the cervical margin of the future implant prosthesis.